Recently I faced a situation where we were required to have functional tests to be able to test certain requirements. This was in a web-based application with dependencies that were hard for us to mock out.
We landed on using Selenium tests to perform testing in a live test environment. In this post, I will walk you through setting up and running Selenium tests in Azure Pipelines targeting a dotnet core web app with an MSSQL database.
Getting started
I am going to make a few assumptions before we move any further into this, and those are:
- You are familiar with dotnet, ASP.NET Core and testing in general.
- You have a project in Azure DevOps that the pipeline will run in.
- You are familiar with basic usage of Docker and Docker Compose.
What is Selenium?
So what is Selenium? Well, as Selenium says themself:
Selenium is a suite of tools for automating web browsers.
Selenium allows you to perform testing through the browser and “mock out” your users. It is not only a testing framework for the web, but it can also be used to automate tasks that need to be done through a web interface. Selenium can be implemented in several ways, you can use the Selenium WebDriver, Selenium IDE, or Selenium Grid. Since we will be writing our tests using code, we’ll pick the WebDriver.
What will we be doing?
To run Selenium tests using the web driver, we will need a live environment to run our tests against. This is because the driver navigates to a website using a given browser and performs the actions you instruct. The way we are going to achieve this is to set up and run an environment inside docker containers.
- Create our app and add some basic functionality to it, including attaching it to an MSSQL database.
- Get our web app running inside Docker
- Write our Selenium tests
- Configure our pipeline to run our tests
All the code and configuration for this post are stored in my blog resources repository, so head over here to see it on GitHub.
What will we be testing?
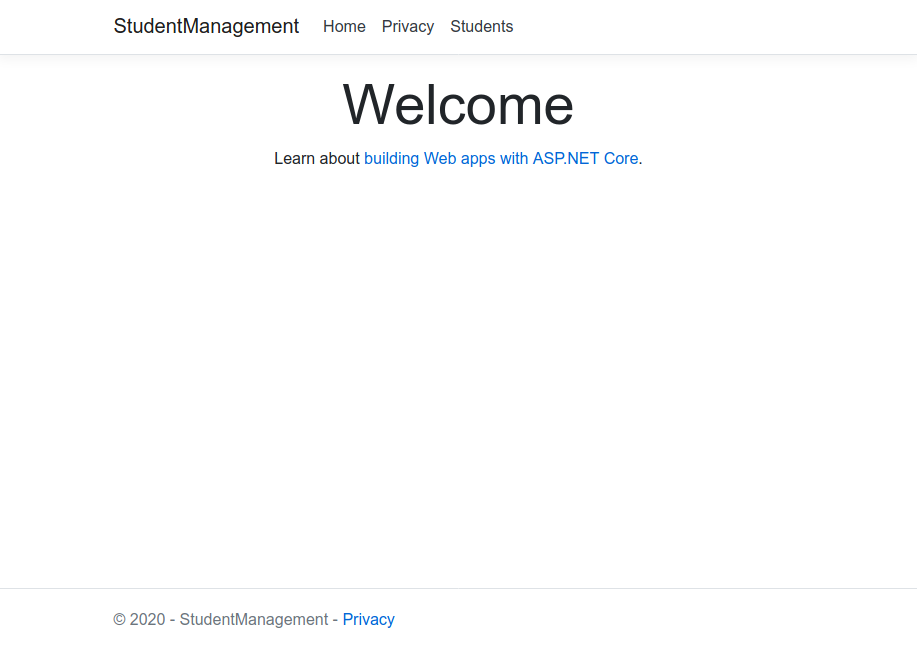
The application we will be testing is “ContosoUniversity” (although I’ve named mine StudentManagement). This is the example from the EF Core with MVC - Get started tutorial. Our tests will cover some basic functionality such as adding and listing students.
Setting up the web app
Before writing our tests we need to create our application. The testing setup will work for any website you can open in your browser. Therefore if you have an existing application you would like to test, you could do the Selenium implementation using that and just modify the needed parts. If you want to follow along with the StudentManagement solution, the best and quickest option would be to clone the repository directly and just delete the StudentManagement.FunctionalTests project.
You could also go through the tutorial listed above, although I have made a few minor changes to it. Primarily I just removed Courses and Enrollments since we will not be using that.
At this point you should have a structure looking something like:
--- StudentManagementApp/
    --- StudentManagement/
        --- <webapp content>
    --- StudentManagement.sln
Run the following command to pull down the Docker image we will be using for our database!
docker pull mcr.microsoft.com/mssql/server:2017-CU21-ubuntu-16.04
Setting up our tests
When writing tests like this I like to follow the page structure and group logic for page into its own class. In that way, we will always know where to go in our code when needing to make a change. Before we can set this up, we need to set up our test project. From the root folder of the project we are going to create a new Xunit project with the following command:
dotnet new xunit -n StudentManagement.FunctionalTests -o StudentManagement.FunctionalTests
Once completed, the next step is to add the Selenium dependencies. We are going to install these by just adding a few Nuget packages. Let us install them by running the commands:
cd StudentManagement.FunctionalTests
dotnet add package Selenium.Support
dotnet add package Selenium.WebDriver
dotnet add package Selenium.WebDriver.GeckoDriver
![]() I am using the GeckoDriver package that will run my tests in Firefox, but there are also packages available for Chrome and Edge/IE.
I am using the GeckoDriver package that will run my tests in Firefox, but there are also packages available for Chrome and Edge/IE.
We will only be using one driver, but if you wish to test your functionality across several different browsers you can install the other packages and modify the tests.
Adding the scaffolding around our tests
Now that we got our test project created and the required dependencies installed, we can start to create the scaffolding around our tests. The first step is to set up a test fixture class. Create a new file, TestsFixture.cs at the root of the project with the following content. You might get an error regarding the TestConfiguration class, we will fix this in the next step.
public class TestsFixture : IDisposable
{
    public IWebDriver Driver;
    public readonly string AppUrl;
    public readonly bool RunHeadless = false;
    public TestsFixture()
    {
        var config = JsonConvert.DeserializeObject<TestConfiguration>(File.ReadAllText("appsettings.test.json"));
        AppUrl = config.AppUrl;
        RunHeadless = config.Headless;
        RefreshDriver();
    }
    public void RefreshDriver()
    {
        Driver?.Quit();
        var options = new FirefoxOptions();
        if (RunHeadless)
        {
            options.AddArguments("-headless");
        }
        Driver = new FirefoxDriver(options);
    }
    public void Dispose()
    {
        Driver.Quit();
    }
}
Next, let us create a configuration file to hold some of our test config. For this we will create two files
TestConfiguration.cs
public class TestConfiguration
{
    public string AppUrl { get; set; }
    public bool Headless { get; set; }
}
and appsettings.test.json
{
  "AppUrl": "",
  "Headless": false
}
Remember to set the ‘Copy to output directory’ to ‘Always’ for this file
These two files will allow us greater control over the testing environment. Take the Headless option for example. Headless mode specifies if the browser should start with a GUI or not. When running locally you probably want to see what happens and then we need headless mode disabled. However, since the pipeline instance we will be using does not have GUI, we need to run it headless.
We should now have a project structure looking like this:
--- StudentManagementApp/
    --- StudentManagement/
        --- <webapp content>
    --- StudentManagement.FunctionalTests
        --- TestsFixture.cs
        --- TestConfiguration.cs
        --- appsettings.test.cs
    --- StudentManagement.sln
Before we go any further, we need get our app up and running so we have something to test against
Configuring docker
To run our mock environment we will use Docker both locally and in the pipeline. First we need encapsulate our WebApp in a container. Remember the database image you pulled down earlier? After our image is built we will create a docker compose setup and run them both. Once this is in place, we can begin our testing.
Building the app
Start by adding a new file called Dockerfile to the StudentManagementApp folder. The content below is from the default file generated from Visual studio. This will serve our purpose just fine for now.
FROM mcr.microsoft.com/dotnet/core/aspnet:3.1 as base
WORKDIR /app
EXPOSE 80

FROM mcr.microsoft.com/dotnet/core/sdk:3.1 AS build
WORKDIR /src
COPY ["StudentManagement/StudentManagement.csproj", "StudentManagement/"]
RUN dotnet restore "StudentManagement/StudentManagement.csproj"
COPY . .
WORKDIR "/src/StudentManagement"
RUN dotnet build "StudentManagement.csproj" -c Release -o /app/build

FROM build AS publish
RUN dotnet publish "StudentManagement.csproj" -c Release -o /app/publish

FROM base AS final
WORKDIR /app
COPY --from=publish /app/publish .
ENTRYPOINT ["dotnet", "StudentManagement.dll"]
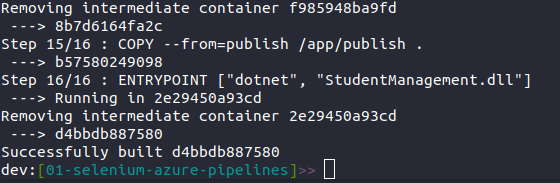
Now it is time to build the image. To do this we will run the command:
docker build .
If all goes well, you should see output telling you the image was built
Connecting it all using Docker Compose
In the same folder as you created the Dockerfile, add a new file named docker-compose.yml
version: "3"
services:
  webserver:
    container_name: webserver
    build:
      dockerfile: Dockerfile
      context: .
    ports:
      - "8000:80"
    depends_on:
      - sqligtest
  sqligtest:
    container_name: sqligtest
    image: "mcr.microsoft.com/mssql/server:2017-CU21-ubuntu-16.04"
    ports:
      - "1433:1433"
    environment:
      SA_PASSWORD: "DatabasePassword123!"
      ACCEPT_EULA: "Y"
The setup here is reasonably simple, we have two containers webserver running the custom image that we created in the previous step and sqligtest running the MSSQL image we pulled earlier. Our web app is exposed on port 8000 and our database on port 1433.
Now, let go back to our app and update our connection string.
{
...
  "ConnectionStrings": {
    "DefaultConnection": "Server=sqligtest;Database=University;Password=DatabasePassword123!;User Id=sa;"
  }
}
![]() To keep it simple the database password is set directly in the files. We are also using the default
To keep it simple the database password is set directly in the files. We are also using the default sa account. Never do that in a real scenario. Keep your variables/password secret and create users with just enough permissions. (The sa (sysadmin) account should never be used as a service account.)
Open a new terminal window and run the command below to start our containers:
docker-compose up --build
Because we updated our settings file, the --build argument is added to instruct Docker to rebuild our image with the latest changes. Open your browser and navigate to http://localhost:8000 and you should see the app running.
Back to the tests
Now that we have our environment running, let us update our appsettings.test.json with the address for our app, we will need this later when running our tests.
{
  "AppUrl": "http://localhost:8000",
  "Headless": false
}
In the StudentManagement.FunctionalTests project, create a new folder named Pages and inside that a file named BasePage.cs. This base page will serve as a wrapper around our child pages and a place for us to add common/shared methods.
public abstract class BasePage
{
    protected readonly IWebDriver Driver;
    protected BasePage(IWebDriver driver)
    {
        Driver = driver;
    }
    public virtual bool IsPageLoaded()
    {
        return false;
    }
}
Let us add another file in the same folder called StudentCreatePage.cs. This file will contain all interactions and details for the Create student page (http://localhost:8000/Students/Create).
public class StudentCreatePage : BasePage
{
    private const string HeaderPath = "/html/body/div/main/h1";
    public const string LastNamePath = "//*[@id=\"LastName\"]";
    public const string FirstNamePath = "//*[@id=\"FirstName\"]";
    public const string EnrollmentDatePath = "//*[@id=\"EnrollmentDate\"]";
    public const string SubmitButtonPath = "/html/body/div/main/div[1]/div/form/div[4]/input";

    public StudentCreatePage(IWebDriver driver) : base(driver)
    {
    }

    public string GetTitle()
    {
        var element = Driver.FindElement(By.XPath(HeaderPath));
        return element.Text;
    }

    public void FillField(string field, string value)
    {
        var element = Driver.FindElement(By.XPath(field));
        element.SendKeys(value);
    }

    public void Submit()
    {
        var submitButton = Driver.FindElement(By.XPath(SubmitButtonPath));
        submitButton.Click();
    }

    public override bool IsPageLoaded()
    {
        try
        {
            return GetTitle() == "Create";
        }
        catch (NoSuchElementException)
        {
            return false;
        }
    }
}
There are a few things going on here, so let us look more into details about some of them. At the top of the file, we find some const fields. These define the XPath to our UI elements. XPath stands for XML Path Language and is used to navigate through the different elements and attributes in an XML document. These paths allow us to instruct Selenium to where on our site it can find specific elements.
![]() Tip: When using the inspector in your browser you can right-click on a node -> Copy -> Copy XPath to get the path.
Tip: When using the inspector in your browser you can right-click on a node -> Copy -> Copy XPath to get the path.
Driver.FindElement(By.XPath(HeaderPath))
Here we instruct Selenium (Driver) to find an element on our page by using the XPath /html/body/div/main/h1. If you would like to know a bit more about XPath, you could take a look here
Let us add one more file to the Pages folder called StudentsIndexPage.cs
public class StudentsIndexPage : BasePage
{
    private const string HeaderPath = "/html/body/div/main/h1";
    public const string TableRowPath = "/html/body/div/main/table/tbody/tr";

    public StudentsIndexPage(IWebDriver driver) : base(driver)
    {
    }

    public string GetTitle()
    {
        var element = Driver.FindElement(By.XPath(HeaderPath));
        return element.Text;
    }

    public int GetStudentCount()
    {
        var element = Driver.FindElements(By.XPath(TableRowPath));
        return element.Count;
    }

    public override bool IsPageLoaded()
    {
        try
        {
            return GetTitle() == "Index";
        }
        catch (NoSuchElementException)
        {
            return false;
        }
    }
}
Great! We are now ready to begin writing our tests. Back at the root of the project, add a folder called Students. This will hold all of our tests for the student domain. Will start by adding a simple test to see that the list of students appears. In the Students folder, add a file called StudentsIndexPageTests.cs with the following content:
public class StudentsIndexPageTests : IClassFixture<TestsFixture>
{
    private readonly TestsFixture _fixture;

    public StudentsIndexPageTests(TestsFixture fixture)
    {
        _fixture = fixture;
    }

    [Fact]
    public void LoadsStudents()
    {
        _fixture.Driver.Navigate().GoToUrl(_fixture.AppUrl + "/Students");
        var indexPage = new StudentsIndexPage(_fixture.Driver);
        var studentCount = indexPage.GetStudentCount();
        Assert.True(studentCount > 0);
    }
}
For the first test we instruct the WebDriver to navigate to the /Students page. When the page is loaded we get all the rows in the table before we assert that this is more than 0 (Our sample app initializes the database with some default values). Next up we are going to try to create a new student from our tests. Create a new file in the Students directory called StudentCreatePageTests.cs and add
public class StudentCreatePageTests : IClassFixture<TestsFixture>
{
    private readonly TestsFixture _fixture;

    public StudentCreatePageTests(TestsFixture fixture)
    {
        _fixture = fixture;
    }

    [Fact]
    public void LoadsCreatePage()
    {
        _fixture.Driver.Navigate().GoToUrl(_fixture.AppUrl + "/Students/Create");
        var indexPage = new StudentsIndexPage(_fixture.Driver);
        Assert.True(indexPage.GetTitle() == "Create");
    }

    [Fact]
    public void CanCreateStudent()
    {
        _fixture.Driver.Navigate().GoToUrl(_fixture.AppUrl + "/Students");
        var indexPage = new StudentsIndexPage(_fixture.Driver);
        var studentCount = indexPage.GetStudentCount();

        _fixture.Driver.Navigate().GoToUrl(_fixture.AppUrl + "/Students/Create");
        var studentCreatePage = new StudentCreatePage(_fixture.Driver);
        var dtStr = DateTime.UtcNow.ToString("MM/dd/yyyy");

        studentCreatePage.FillField(StudentCreatePage.LastNamePath, "MyNewLastName");
        studentCreatePage.FillField(StudentCreatePage.FirstNamePath, "MyNewFirstName");
        studentCreatePage.FillField(StudentCreatePage.EnrollmentDatePath, dtStr);

        studentCreatePage.Submit();

        Assert.True(indexPage.GetTitle() == "Index");
        Assert.Equal(studentCount + 1, indexPage.GetStudentCount());
    }
}
For the CanCreateStudent test, we first fetch the count of students before navigating to the create view and filling out the fields. After submitting the student we are automatically redirected back to the index page and once again we fetch the student count. Now we assert that the count is one greater than the first time we fetched it.
![]() When writing the tests locally you might meet unexpected data or duplicate data. This is because the environment is running just as it would in production, meaning that our data is persisted. You can reset the environment by running the following commands in the folder containing the
When writing the tests locally you might meet unexpected data or duplicate data. This is because the environment is running just as it would in production, meaning that our data is persisted. You can reset the environment by running the following commands in the folder containing the docker-compose.yml file
docker-compose stop
docker-compose rm
docker-compose up
There has been a few changes since we last visited the project structure, so now it should now look like this:
--- StudentManagementApp/
    --- StudentManagement/
        --- <webapp content>
    --- StudentManagement.FunctionalTests
        --- TestsFixture.cs
        --- TestConfiguration.cs
        --- appsettings.test.cs
        --- Pages
            --- BasePage.cs
            --- StudentsIndexPage.cs
            --- StudentCreatePage.cs
        --- Students
            --- StudentsIndexPageTests.cs
            --- StudentCreatePageTests.cs
    --- StudentManagement.sln
    --- Dockerfile
    --- docker-compose.yml
Creating the pipeline
We have configured our project, added some tests, and created the infrastructure. You have run the tests locally and verified that they are working as expected. The next step is to get our tests running in our pipeline. To keep it simple I will create a pipeline with the sole purpose of running our tests, but this would normally just be another stage or job in your existing pipeline.
Once again we will create a new file azure-pipelines.yml in the StudentManagementApp folder with the following content:
resources:
  repositories:
    - repository: self
      type: git
      name: MyProject/StudentManagement
      trigger:
        - master

variables:
  AppUrl: "http://localhost:8000"
  Headless: true

stages:
  - stage: Build
    displayName: Build image
    jobs:
      - job: Build
        displayName: Build
        pool:
          vmImage: "ubuntu-latest"
        steps:
          - task: DockerCompose@0
            displayName: "Run application and db"
            inputs:
              containerregistrytype: "Container Registry"
              dockerComposeFile: "**/docker-compose.yml"
              action: "Run services"
          - task: FileTransform@1
            inputs:
              folderPath: "$(System.DefaultWorkingDirectory)/StudentManagement.FunctionalTests/appsettings.test.json"
              fileType: "json"
          - task: DotNetCoreCLI@2
            displayName: "Restore project dependencies"
            inputs:
              command: "restore"
              projects: "**/*.sln"
          - task: DotNetCoreCLI@2
            displayName: "Build the project - Release"
            inputs:
              command: "build"
              arguments: "--no-restore --configuration Release"
              projects: "**/*.sln"
          - task: DotNetCoreCLI@2
            displayName: "Run Tests"
            inputs:
              command: "test"
              projects: "**/*FunctionalTests.csproj"
              arguments: "--configuration Release --no-restore --no-build"
Let us break this down a bit:
Source code
resources:
  repositories:
    - repository: self
      type: git
      name: MyProject/StudentManagement
      trigger:
        - master
Here we define that our code is stored in an Azure Repo, in the project MyProject and the repository StudentManagement. This pipeline will trigger when it picks up any changes in the master branch.
Running our app and database
- task: DockerCompose@0
  displayName: "Run application and db"
  inputs:
    containerregistrytype: "Container Registry"
    dockerComposeFile: "**/docker-compose.yml"
    action: "Run services"
Since we already have our testing environment configured through docker compose we will just reuse this in our pipeline. To do this we use the DockerCompose task and give it the path to our docker-compose.yml file.
Updating our configuration file
This step is not strictly necessary, but good if you run different configuration locally and in the pipeline
variables:
  AppUrl: "http://localhost:8000"
  Headless: true
We defined these variables close to the top of our file and it is no coincidence that the keys match our appsettings.test.json file. The FileTransform task updates our setting file and applies the variables defined here. Unless you changed something in the Docker setup, the AppUrl will be just replaced with the same value. The most important part here is setting Headless to true as discussed earlier in this post.
Running our tests
The last three DotNetCoreCli steps build our app before running the tests.
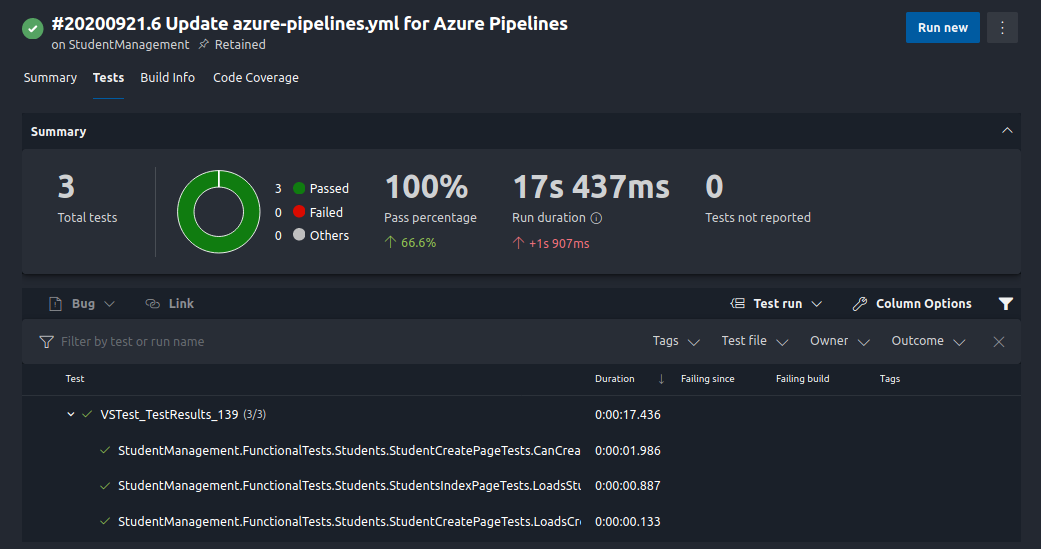
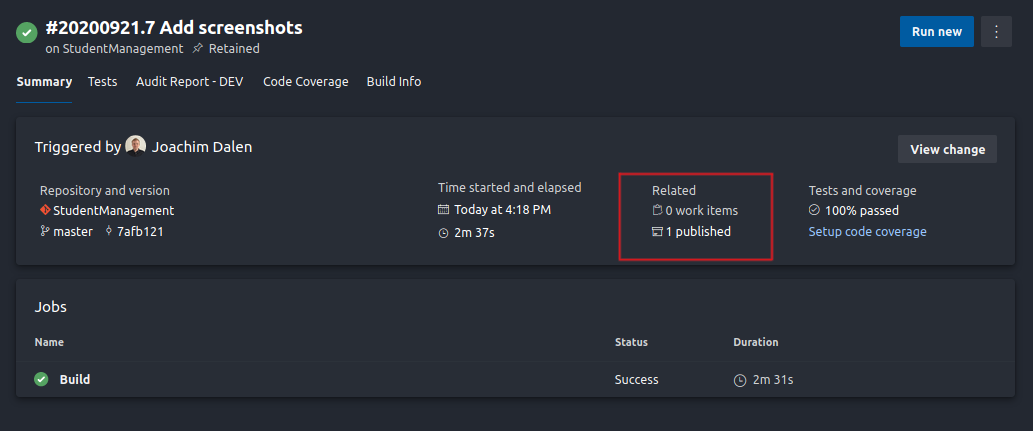
Now, push your changes and run the pipeline. If all went well you should see a successful build.
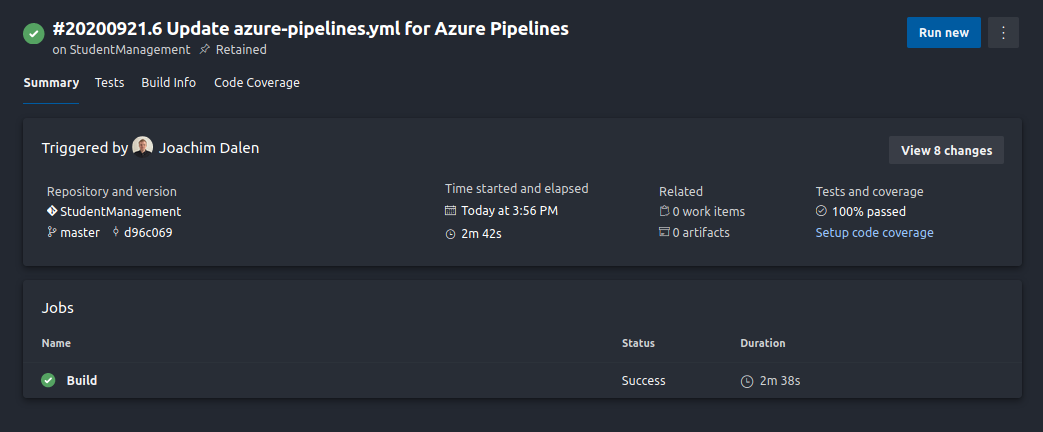
If we look at our tests, we see that they all ran green:
Capturing screenshots in our tests
Before we round this off, let us add one more feature to our tests, screenshots! With the Selenium driver, you can take screenshots to capture the state during your tests. This can be useful if you want to capture the state for example if a test fails or want to do additional checks after the tests are run.
Let’s start by adding the folder path to where our images will be stored in the settings. Update appsettings.test.json with a new property ScreenShotLocation and add a path to it.
{
  "AppUrl": "http://localhost:8000",
  "Headless": false,
  "ScreenShotLocation": "/home/dev/Pictures/test-screenshots"
}
and add the corresponding value to TestConfiguration.cs
public class TestConfiguration
{
    public string AppUrl { get; set; }
    public bool Headless { get; set; }
    public string ScreenShotLocation { get; set; }
}
Great! For the next step we will add a method to our base page for taking the screenshot, and we will update our code to accept the new configuration value. Update the file BasePage.cs to match the following.
public abstract class BasePage
{
  protected readonly IWebDriver Driver;
  protected readonly string ScreenShotLocation;

  protected BasePage(IWebDriver driver, string screenShotLocation)
  {
    Driver = driver;
    ScreenShotLocation = screenShotLocation;
  }

  public void TakeScreenshot([CallerMemberName] string callingMember = "sc")
  {
    var screenshotDriver = Driver as ITakesScreenshot;
    var screenshot = screenshotDriver?.GetScreenshot();
    if (!Directory.Exists(ScreenShotLocation)) {
      Directory.CreateDirectory(ScreenShotLocation);
    }
    screenshot?.SaveAsFile(Path.Join(ScreenShotLocation,
      $"{callingMember}_{DateTime.Now.ToFileTime()}.png"),
      ScreenshotImageFormat.Png);
  }
}
Here we added a new parameter to send in the path, we added a property to store the path for the class and we added the method TakeScreenshot that will take the screenshot for us.
![]() The attribute
The attribute CallerMemberName passed in as the parameter to our method allows us to get the name of the method that calls our method. This means that we get the name of our test as the first part of our screenshot name. You’ll see this in use a bit further down.
Since we changed the constructor of our base page, we also need to update the constructor of our two other pages
public StudentCreatePage(IWebDriver driver, string screenShotLocation) : base(driver, screenShotLocation)
public StudentsIndexPage(IWebDriver driver, string screenShotLocation) : base(driver, screenShotLocation)
and the usage of these in our tests
var studentCreatePage = new StudentCreatePage(_fixture.Driver, _fixture.ScreenShotLocation);
var indexPage = new StudentsIndexPage(_fixture.Driver, _fixture.ScreenShotLocation);
Time to start taking some screenshots! In the CanCreateStudent (StudentCreatePageTests.cs) test, we can take a screenshot right before we submit the form.
[Fact]
public void CanCreateStudent()
{
  ....

  studentCreatePage.TakeScreenshot();
  studentCreatePage.Submit();

  Assert.True(indexPage.GetTitle() == "Index");
  Assert.Equal(studentCount + 1, indexPage.GetStudentCount());
}
To have some more to look at, we can also get a screenshot after we have listed our the students LoadsStudents (StudentsIndexPageTests.cs)
[Fact]
public void LoadsStudents() {
  ...
  var studentCount = indexPage.GetStudentCount();
  indexPage.TakeScreenshot();

  Assert.True(studentCount > 0);
}
As the last step, we need to update our pipeline with two small changes. First, we need to add a new variable to our pipeline configuration:
variables:
  AppUrl: "http://localhost:8000"
  Headless: true
  ScreenShotLocation: "$(Build.ArtifactStagingDirectory)"
Like before, this value will automatically be transformed in our appsettings.test.json file by the FileTransform task. Great! Our screenshots are now being taken and stored in a directory on the pipeline agent, but this will not do us any good. The agent does not persist this content when our pipeline is finished, so we need to add it as an artifact that gets published alongside our build. To do this we will add one more step to our pipeline. This step will take all the content of the folder we gave as the screenshot location and publish it to a container named screenshots (you can name this something else if you want).
- task: PublishBuildArtifacts@1
  condition: always()
  inputs:
    PathtoPublish: "$(Build.ArtifactStagingDirectory)"
    ArtifactName: "screenshots"
    publishLocation: "Container"
![]() Notice the
Notice the condition: always() configuration? This will instruct the agent to always run the step, even if our tests fail. This way our screenshots are always published.
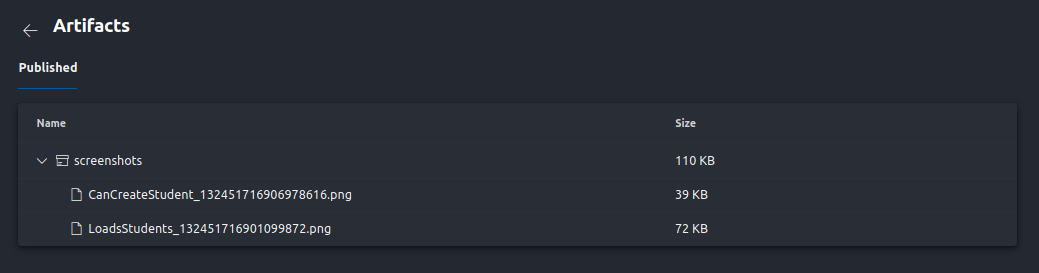
Run your pipeline again and you should need that an artifact has been published:
Going into that we can see the two screenshots captured in our tests:
![]() Remember the attribute
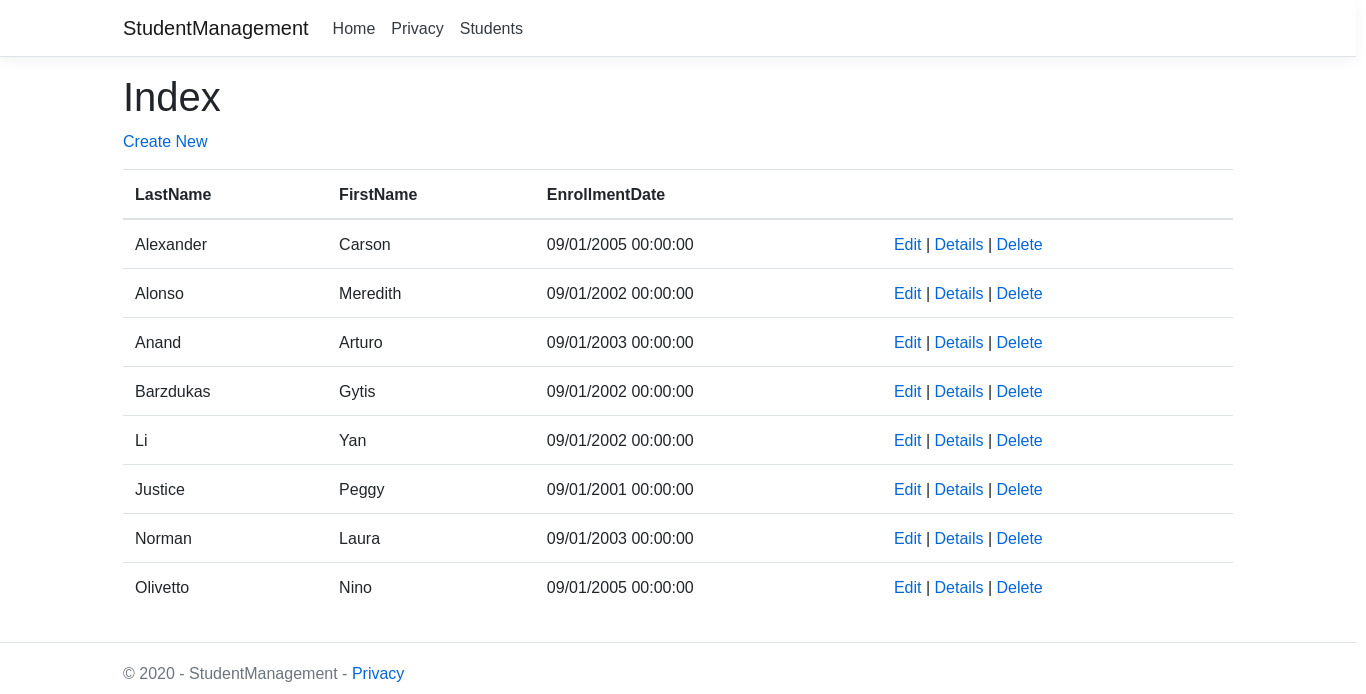
Remember the attribute CalledMemberName I mentioned earlier? Here you see that the screenshot we took in the CanCreateStudent method has gotten the prefix CanCreateStudent. This is an easy way to help us keep track of where the screenshots were taken.
Here is the image we took in our LoadsStudents test
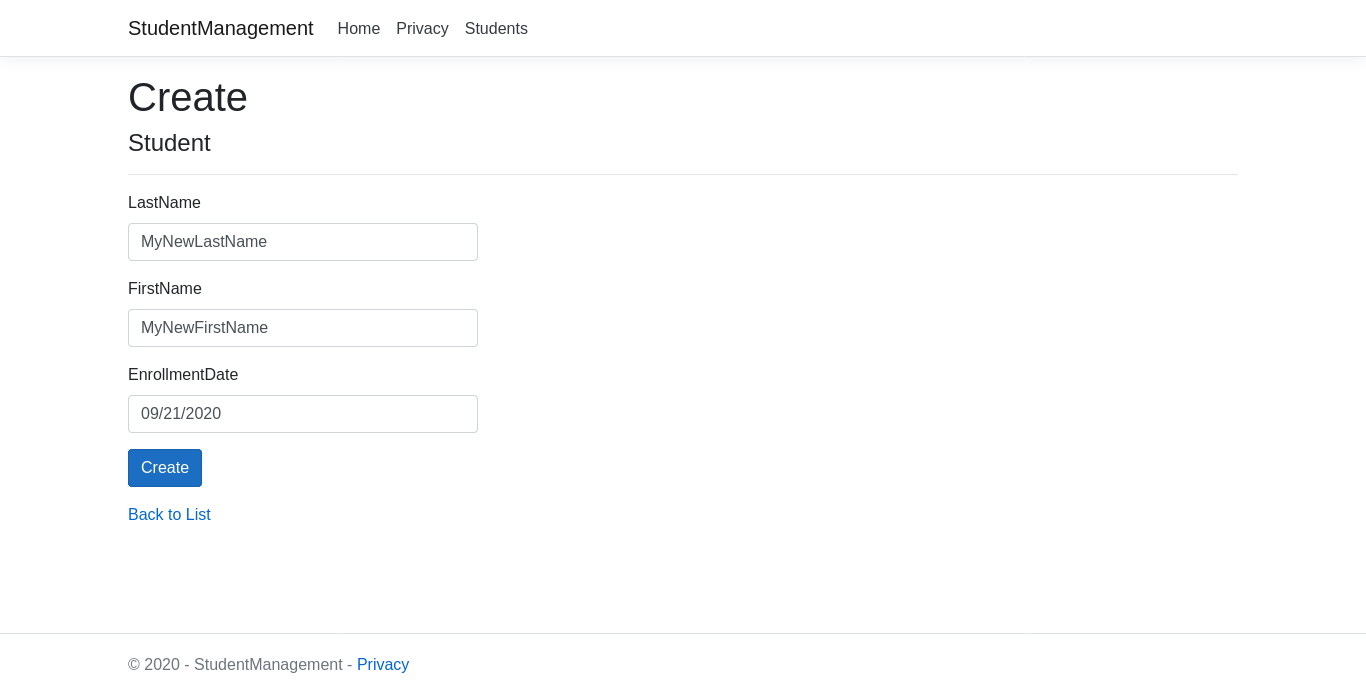
and the one from the CanCreateStudent test right before we submitted
![]() Suggestion: Implement a switch in the test configuration and tests to prevent screenshots from being taken locally.
Suggestion: Implement a switch in the test configuration and tests to prevent screenshots from being taken locally.
Reflection
That is it! You now should have an idea (hopefully) on how you can implement and run selenium tests backed by the database in your pipeline.
Now for the most important part of this, reflection! Take a minute and think about what we just did and ask yourself these questions:
- Was there something you did not understand?
- Is there something you think could have been better or done differently?
If your answer to any of these questions is ‘yes’, reach out to me and we can discuss! I am always happy to go back and update older posts to make it more clear and educational for the reader. You can reach me on Twitter or file a new issue in the resources repository where you fetched the source code from!
Until next time!
// Joachim