In my last post, we looked at keeping code clean using linters to keep a consistent coding style for our project. A different topic that we will look at today is tests and code coverage.
Something to keep in mind
Tests are not only useful to ensure our code meets our functional expecations, but they are also useful for any new developers introduced to our project. Having a good test foundation can help new developers getting started quicker, and well written tests can allow them to ensure they are not breaking existing functionality when introducing changes to the code base. In some cases they can also be useful source for information about how the application behaves and how data flows through it.
With that said, no test suite is perfect and one should not fully rely on the tests to verify that everything works as expected. Tests can be written wrong or miss use cases that will still make the functionality fail.
Test suites and code coverage can give a false sense of security, and even though your project has 100% code coverage it does not mean that all edge cases, inputs, and outcomes are tested.
Getting started
This time we are going to continue the work on the module I created in the previous post. We will add some simple tests and produce a code coverage report. In addition to this, we will look at how we can run these tests in our Azure Pipeline and publish the test results and code coverage for display and verification.
I am going to make a few assumptions before we move any further into this post:
- You have basic knowledge about writing tests.
- You have a project in Azure DevOps that the pipeline will run in.
The code for this post will be available on my GitHub. Sources from my last post are also available here.
Setting up our tests and coverage
Installing dependencies
For our tests, we will be using Testing Library, Jest, and ts-node. We will also install some helper packages.
| Package | Description |
|---|---|
| @testing-library/react | Simple and complete React DOM testing utilities that encourage good testing practices |
| @testing-library/jest-dom | Custom jest matchers to test the state of the DOM |
| @types/jest | TypeScript definitions for Jest |
| jest | Delightful JavaScript Testing |
| ts-jest | A preprocessor with source maps support to help use TypeScript with Jest |
| jest-junit-reporter | A JUnit test report formatter for Jest. |
![]() Descriptions are from the packages npm page
Descriptions are from the packages npm page
Let us get started with installing the needed dependencies by running the following command:
npm i -D @testing-library/react jest @types/jest @testing-library/jest-dom ts-jest jest-junit-reporter
Configuring our setup
Next, we need to configure Jest. Create a new file in the root of the project called jest.config.js with the following content:
/* eslint-disable */
module.exports = {
  roots: ["<rootDir>/src"],
  testMatch: [
    "**/__tests__/**/*.+(ts|tsx|js)",
    "**/?(*.)+(spec|test).+(ts|tsx|js)",
  ],
  transform: {
    "^.+\\.(ts|tsx)$": "ts-jest",
  },
  moduleNameMapper: {
    "\\.(css)$": "<rootDir>/src/__mocks__/styleMock.js",
  },
  coverageReporters: ["text", "cobertura"],
  testResultsProcessor: "jest-junit-reporter",
};
A few things are happening here. First, we set the root directory of our sources and tell Jest where it can find our tests. We specify that all ts and tsx files should be preprocessed by ts-jest during the process. We import our CSS file in the RandomNumberCard component, since we have not added a preprocessor that can handle CSS files we need to mock our these files.
For coverage reporters, we have added text that will allow console output and cobertura that is one of the supported formats for Azure Pipelines. For test results we have added jest-junit-reporter as a processor so we can see what tests have been run.
We also need to add the mock file for our styles, so create the file src/__mocks__/styleMock.js with the following content:
/* eslint-disable */
module.exports = {};
Writing some simple tests
We now have the test setup configured, and we can start to write our tests. Create a new file src/__tests__/RandomNumberCard.test.tsx with the following content:
import "@testing-library/jest-dom/extend-expect";

import { fireEvent, render } from "@testing-library/react";
import React from "react";

import RandomNumberCard from "../RandomNumberCard";

describe("<RandomNumberCard />", () => {
  it("should start on 0", () => {
    const { container } = render(<RandomNumberCard />);
    const tag = container.getElementsByClassName("RandomNumberCard__number")[0];

    expect(tag.innerHTML).toEqual("0");
  });

  it("should change when clicked", () => {
    const { container } = render(<RandomNumberCard />);
    const card = container.getElementsByClassName("RandomNumberCard")[0];
    fireEvent.click(card);

    const tag = card.getElementsByClassName("RandomNumberCard__number")[0];

    expect(tag.innerHTML).not.toEqual("0");
  });
});
Since this post focuses on getting the tests and coverage up and running in our pipeline, I will not go deep into the technical details about how to write tests.
We will however take a quick look at what is going on so we are all on the same page. For the first test, we want to ensure that our random value starts at 0. First, we render our component before we do a query against the DOM to fetch all the elements with the class RandomNumberCard__number. We then pick the first element before checking that the value of this element is equal to "0"
Our next test starts the same, but we have some additional steps here. After retrieving the element we fire off the click event for our component to update the random number. We then repeat the process from our previous test, but this time we check that the value is not equal to "0"
To make our tests runs a bit easier to start, we will add some new scripts to our package.json file.
"test": "jest --coverage",
"test:ci": "jest --coverage --ci"
The first script we use to run our tests locally, while the second script is intended for our pipeline. Directly for our tests, the --ci option does not do anything, but you should add this if your tests contain snapshots. Additional information about this option can be found in the Jest documentation.
Let us try to run our tests locally using the command npm run test. When the test run completes, we should see an output similar to this:
> jest --coverage

 PASS  src/__tests__/RandomNumberCard.test.tsx
  <RandomNumberCard />
    ✓ should start on 0 (25 ms)
    ✓ should change when clicked (10 ms)

----------------------|---------|----------|---------|---------|-------------------
File                  | % Stmts | % Branch | % Funcs | % Lines | Uncovered Line #s
----------------------|---------|----------|---------|---------|-------------------
All files             |     100 |      100 |     100 |     100 |
 RandomNumberCard.tsx |     100 |      100 |     100 |     100 |
----------------------|---------|----------|---------|---------|-------------------
Test Suites: 1 passed, 1 total
Tests:       2 passed, 2 total
Snapshots:   0 total
Time:        1.51 s, estimated 7 s
Ran all test suites.
All of our tests passed and we can also see the total code coverage.
Updating our pipeline
We have our tests with code coverage running locally. It is time to update our pipeline to run the same tests. For this we need to implement a few new steps:
At the end of our current pipeline we will add the following step to trigger our test run:
- task: Npm@1
  displayName: "Run tests"
  inputs:
    command: "custom"
    customCommand: "run test:ci"
I like to move all the files being published to the artifact staging directory, but if you want you can publish the files directly from their created paths by just changing the paths in our tasks. Let us add the following to move the files:
- task: Bash@3
  displayName: "Move cover files"
  inputs:
    targetType: "inline"
    script: |
      cp -r $(Build.SourcesDirectory)/coverage $(Build.ArtifactStagingDirectory)
- task: Bash@3
  displayName: "Move report"
  inputs:
    targetType: "inline"
    script: |
      mkdir $(Build.ArtifactStagingDirectory)/reports
      cp $(Build.SourcesDirectory)/test-report.xml $(Build.ArtifactStagingDirectory)/reports/test-report.xml
To be able to view our test result and code coverage we need to publish the files. The first taks will publish the test run report (This is the report created by the jest-junit-reportertest results processor) while the second step publishes out code coverage.
- task: PublishTestResults@2
  displayName: "Publish test results"
  inputs:
    testResultsFormat: "JUnit"
    testResultsFiles: "$(Build.ArtifactStagingDirectory)/reports/test-report.xml"
- task: PublishCodeCoverageResults@1
  inputs:
    codeCoverageTool: "Cobertura"
    summaryFileLocation: "$(Build.ArtifactStagingDirectory)/coverage/cobertura-coverage.xml"
    pathToSources: "$(Build.SourcesDirectory)/src"
At this point we have everything we need in our pipeline, if you want to see the full file after the changes you can view it here
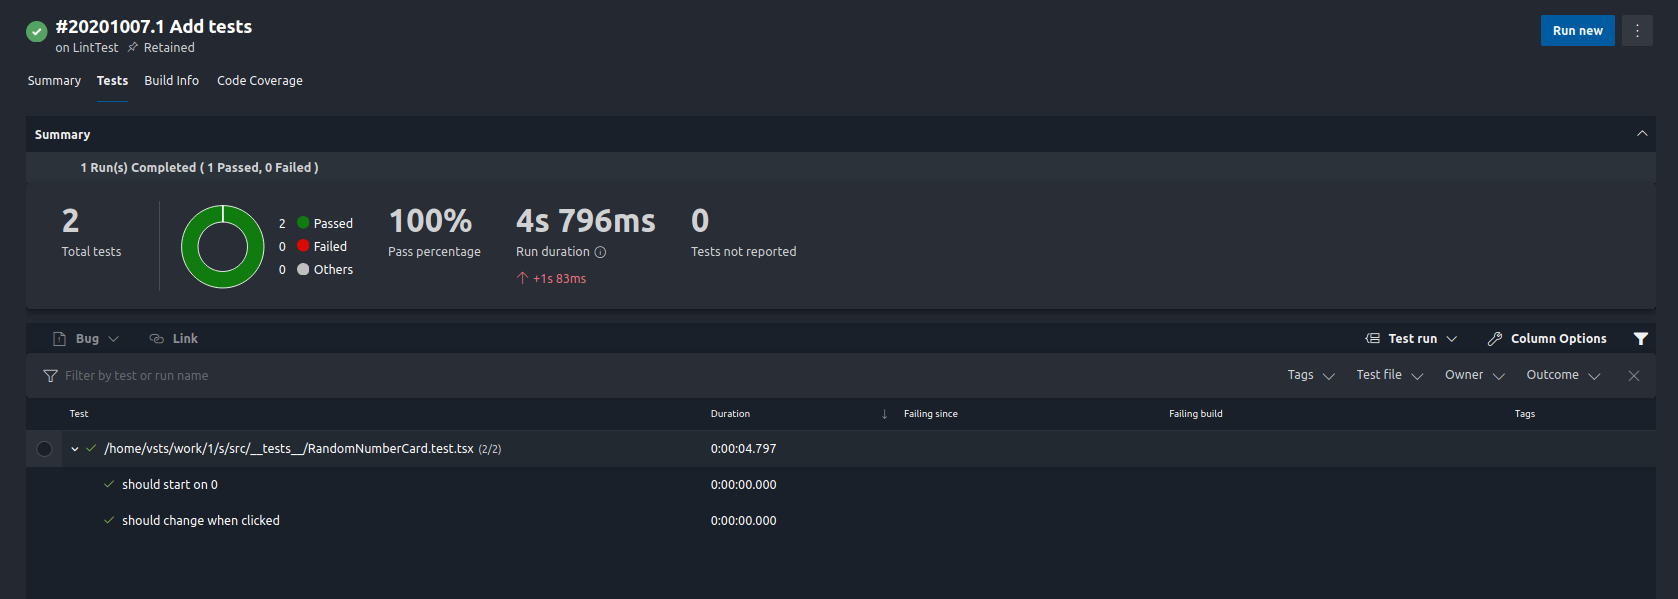
Push your changes and run the pipeline, when it completes we should see that our test results and code coverage have been published.
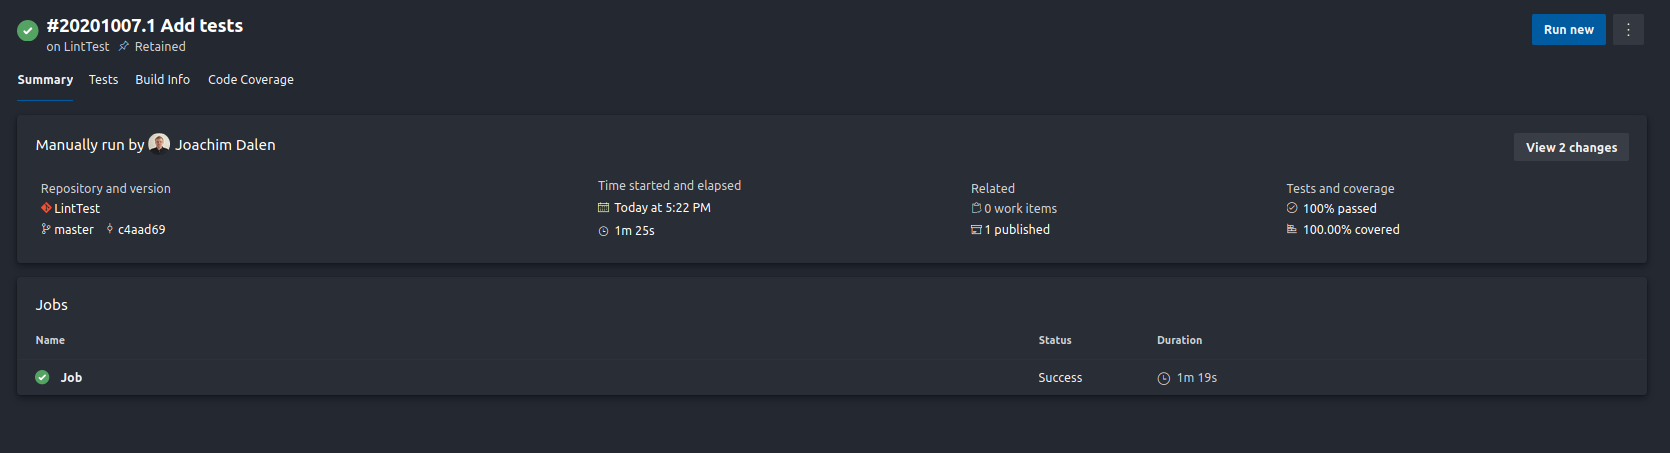
Checking our tests we can see all the test files and individual tests
We can also view the coverage report of our code

Sidenote
When running the PublishCodeCoverageResults step, you might see a warning like this in the log:
The Cobertura report is not well formed. The
element should contain elements and not elements.
This is a bug in Istanbul that is used by jest to create coverage and is caused when all test files are located in the same directory. Depending on how your project is set up you might see this. Our coverage is published and still visible, so we’ll ignore this for now. More info can be found in the GitHub issue if you are interested.
Reflection
That was it for this post! This time we continued to expand the quality control of our project by adding tests and coverage. Our project quality was increased by extending it with tests and code coverage.
Take a moment to this about this; what do you think is most important in a project to keep it clean, under control, and with high quality? If you have any great answers, techniques, or stories to share I’d like to hear about them!